Wednesday, April 14, 2010

Banana Bread

Banana bread is a favorite in our home. We usually go through banana "phases" where I can't keep up because everyone is eating a banana almost every day (and for some people, more than one...*cough*Julia*cough*). Then, after having to buy bunches of bananas multiple times throughout the week, the banana "phase" will end and I'm stuck with a bunch of bananas that no one wants that are starting to ripen just a little too much.

When this happens, I throw the bananas into the freezer for future banana bread. My mom is always startled by my frozen, now black, bananas I have just sitting in a drawer in my freezer. I think it grosses her out. I tell her that I don't have to use frozen bananas, but it works better for me. Then I don't feel pressured to make banana bread when the bananas are super ripe--because what if I only have one super ripe banana? That's not enough to make banana bread. And what if I have like 5 too ripe bananas? That's too many and we can't eat that much banana bread before it goes stale.

These are my problems, people. Overly ripe banana usage.

So, I freeze my bananas and then I make delicious banana bread when I so choose. And now I shall share my recipe with you!

I went through quite a few recipes before I found this one that turns out perfectly for me each and every time.

The ingredients:
3 overripe bananas; 1 1/2 C. flour; 1 C. sugar; 1/2 tsp. baking soda; dash of salt; 1 egg; 1/2 stick of butter, melted. Preheat the oven to 325 degrees.

Now, if you have 3 overripe bananas that were not frozen, then just peel them and toss them into a small bowl for mushing. If your bananas are frozen, then either let them thaw on the counter (caution: they will leak) or defrost them in the microwave. Then, peel the top off and squeeze the bananas out of the peel. Yes, this does look gross. I'm sorry.
Mash the bananas.
In the mixer bowl, add the flour...
the sugar...
the baking soda...
the salt (a dash of salt, to me, means 1/8th of a tsp, just so you know)...the egg...
the melted butter...
and the mashed bananas.
Mix until well blended.
Make sure that you really grease the loaf pan, because nothing is worse than freshly baked bread that won't come out of the pan!
Pour the bread mixture into the pan and toss it in the oven for 1 hour and 10 minutes.
And, TA DA!, you have a lovely loaf of banana bread.
I usually scrape the edges of the bread while it's still hot to double ensure that it will not stick to the pan. (Can you tell I have issues with sticky bread?)
Let the bread cool.
Here it is. Look how brown and yummy...
Mmmm.


Monday, April 12, 2010

April Fool's Dinner.

Oh, April Fool's Day. How I don't really care for you.

It's not that I don't like a good joke or a hearty laugh at someone else's expense (cause I do...believe me, I do), but it's just not a holiday that I've ever really been that into. I remember in junior high switching a friend's sandwich with one I had concocted myself. While he thought he was biting into a delicious peanut butter and jelly sandwich, little did he know that he was in for a giant bite of peanut butter and jelly and pepper and onion powder sandwich with some Worcestershire sauce for good measure. I laughed till I cried at seeing his face. Classic.

But, normally, I don't usually do anything with this holiday. Until this year.

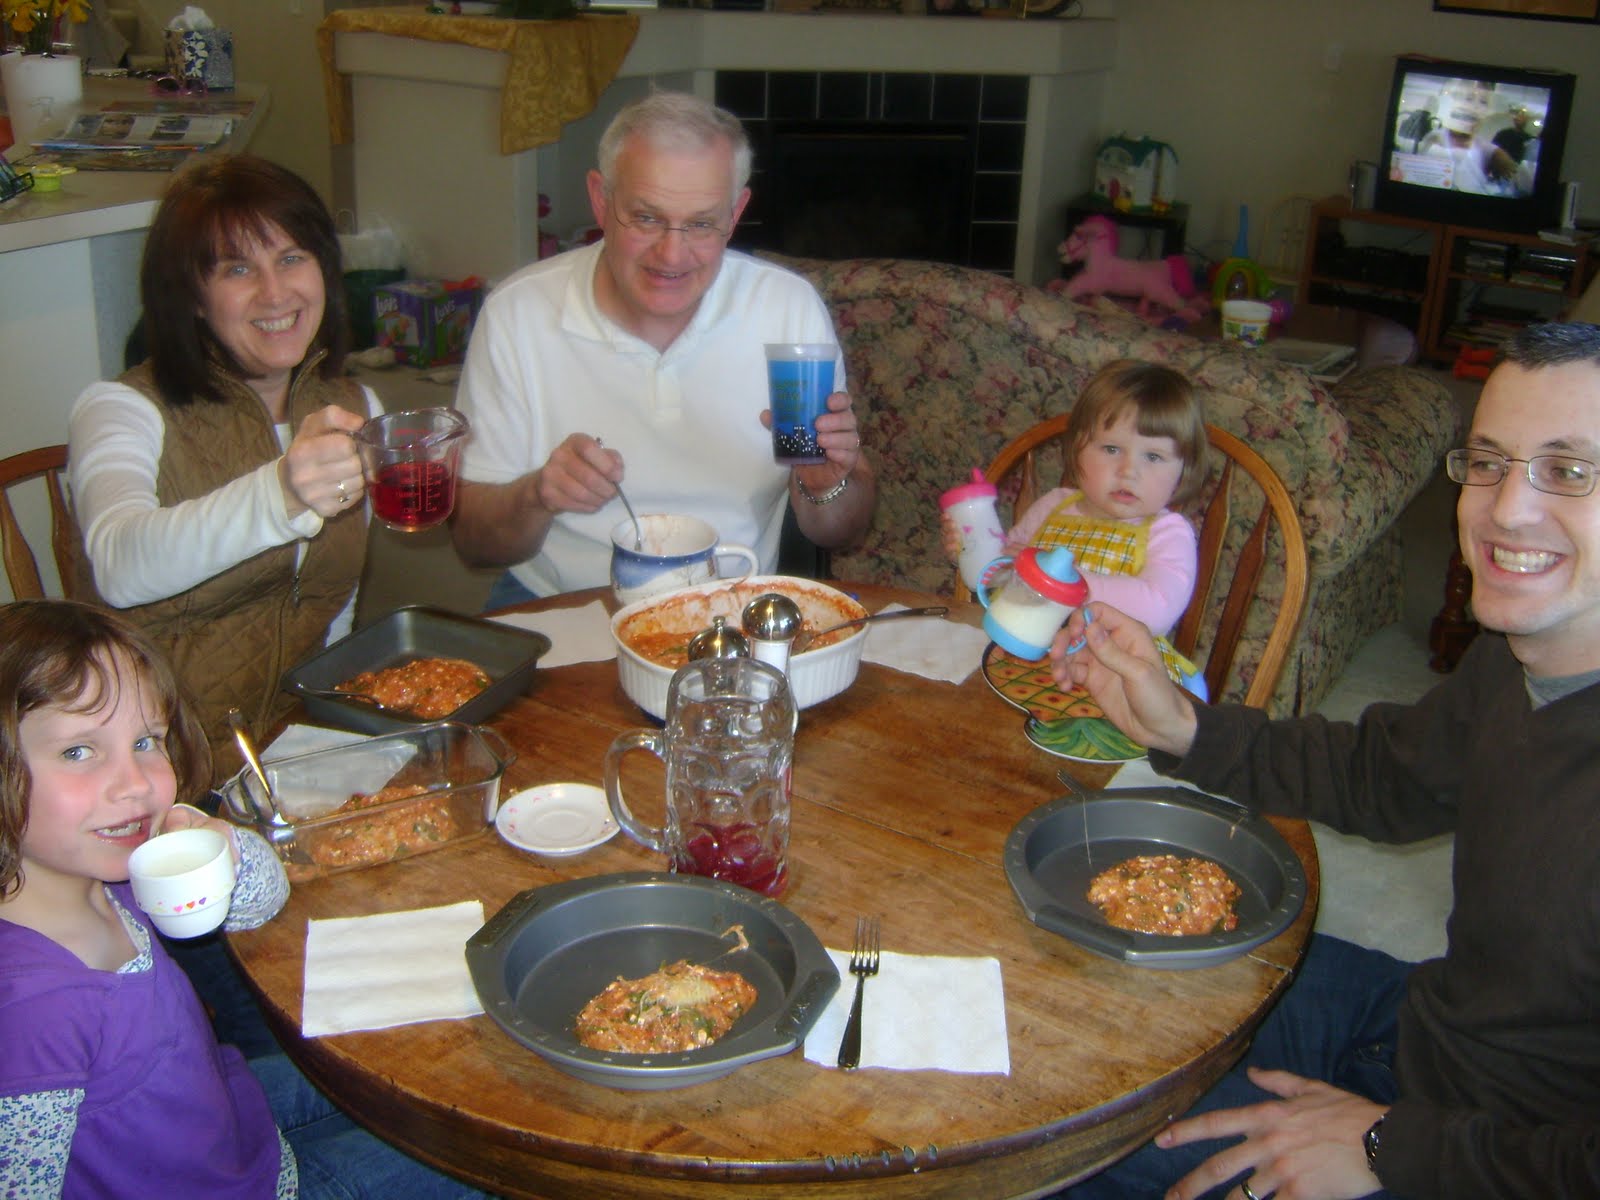
Apparently, when Evan was little, his family would have an April Fool's Day dinner where they would eat off of weird "plates" and eat things were "gross". So, since Jana and Keith were here, and since Elisabeth is 7 years old and a giant fan of slap stick and gross-out humor, Jana decided to have an April Fool's Day dinner. Elisabeth's plan was to trick Evan since everyone else was in on the secret.

Jana found a recipe for Chunky Cat Barf online. We went to the store to find the ingredients needed. She also found a recipe for dessert: Baked Potatoes. She and Elisabeth went about making supper before Evan could come home and see it. I was in charge of setting the table.

Can I please tell you that finding "place settings" outside of the box was harder than I thought. But, this is what I came up with:
When Evan walked in the door after work, Elisabeth instantly went into this long, drawn out story about how our cat Roosevelt had gotten outside and eaten too much grass and had puked everywhere in the house. Evan already knew something was up because, not only is Elisabeth a horrific liar but she is also a terrible secret keeper, and she had told him we were eating something gross for dinner the night before. (Honestly, if she continues to be such a rotten liar, having her as a teenager will be fine.)

This was our Chunky Cat Barf dinner.
It seriously looked like cat barf. Jana even added spinach to the recipe as the "grass". Gross.

Here is everyone eating up! It actually ended up being a delicious meal. Seriously.
I tried to be creative with the "glasses". Jana drank wine from a measuring cup.
Julia had no idea what the heck was going on. She just likes to eat.
Evan drank milk from a sippy cup, which infuriated Julia to no end.
I drank wine from a beer stein.
Julia kept leaning over and hugging Keith throughout the whole meal. She loves her Papa.
Then it was dessert time. Evan did not know about this dessert because I threatened Elisabeth's life to actually just say it was a baked potato and not go into any more details.
He wondered what was up when we got the potatoes out of the freezer.
They were delish!
Overall, the dinner was fun. Elisabeth was the most excited and proud of "tricking" Evan. I have a feeling that this is now a new tradition in our home. Looks like I'll be searching for new, gross meals for next year.

Saturday, April 10, 2010

Guest Cook- Ethan Cain!

Hello, Ethan Cain here. I'm only 3 but I'm a prolific writer and an excellent cook. I just had to try my hand at making Aunt VA's baked sesame chicken.

The real reason why I had to make it? My mommy was about to make it with SUNFLOWER SEEDS. That lady needs help! Lots of it!


Forgive me, I'm only 3 so I evidently am unable to post pictures in the correct order. Above is the 'after' picture of my corner where I like to help cook. As always, I was quite helpful and my mommy and daddy loved cleaning up after me!

Now then, down to business...
We didn't have an sesame seeds, so I decided it would be fun to use the mortar and pestle set to crush ramen noodles instead to make a crunchy coating. (Wouldn't you know it....the mortar and pestle is good for other things than squishing melatonin for my applesauce 'sleepy snack'.)
See how I'm using my right hand? I'm trying to trick everyone into thinking I'm left handed, then, as soon as they aren't looking I use my right and. Clever, huh?
More grinding. This is important stuff.

So, basically the chicken was super crunchy. We ate it anyway and no one broke a tooth. Perhaps next time we will actually follow the directions (booooooooring). The plus side? We saved the chicken and made yummy chinese chicken salad the next night!

Chinese Chicken Salad

Ingredients:
1 pkg. cole slaw
1 bunch green onions, chopped
1/2 C. sunflower seeds
2 pkg. ramen noodles, crushed
shredded or cubed cooked chicken (about 1/2 lb.)

Dressing:
1/2 C. sugar
2 Tbsp. soy sauce
1/4 C. red wine vinegar
1/4 C. sesame oil
1/4 C. vegetable oil
1/4 C. water
1 pkg. oriental ramen seasoning

Toast seeds & ramen in oven--350 degrees. Mix dressing ingredients and heat in microwave on high for 1 minute. Combine dressing with ingredients. Toss and chill.

Enjoy. :)

Thursday, April 8, 2010

Coconut Joys

When Elisabeth asked to buy a coconut at the store, I hesitated for a split second, because coconuts can be pricey. When I saw they were only $1.49, I said sure.

Then we brought it home and Evan asked what we would be doing with the coconut and I shrugged. I had never dealt with a real coconut before. So, I went to my friend Google, learned how to open the darn thing, and then listened to my mother-in-law as she told me to make her Coconut Joys that she usually makes at Christmas time.

You gotta listen to your mother-in-law when she's in your home and knows a thing or two about cooking. And baking.

As soon as she mentioned the Coconut Joys, I remembered the deliciousness that is this splendid little cookie. Then, I looked at the ingredients and knew I would be making these often; they are quite, quite simple.

Ingredients:

1/2 C. butter, melted; 2 C. confectioners sugar; 3 C. flaked coconut; 1 Tbsp. milk; 1/2 C. semi-sweet chocolate chips.


Now, here is where I tell you that the shredded coconut you are about to see was not grated by me. Evan and his mom took turns grating it. I was on the couch with a massive headache and reading a book. So, obviously, I did all the hard work. ;)

Okay, take your coconut...

add the powdered sugar...

and the milk. Except, instead of milk, I used the coconut water from the actual coconut. Because I had it and I could.

Add the melted butter and then mix them all together until they make a nice gloppy, coconutty mixture.

Take a tablespoon of the "cookie dough" (cause, I guess it's cookie dough...) and roll it into a ball.

Press your finger ever so gently into the ball of coconut joy.

And leave a little dent.

Do this to all of them.

Then, take the chocolate chip cookies...

and throw them in a small sauce pan and start melting them. (My mother-in-law told me she just throws them in a bowl and melts them in the microwave. After a chocolate catastrophe involving melting chocolate chips in a microwave, I have vowed to always use the stove.)

Melted!! I love melted chocolate.

Then, spoon some chocolate into the dents you made in the cookies.

And, VIOLA!, you are done. Now, all you have to do is place them in the refrigerator to chill.


Jana noticed that with me using the coconut water, they were a bit sweeter than when she makes them with the milk, but it was a good sweeter! Also, you will need to store these deliciously delicious cookies in the refrigerator (you know, if you haven't eaten them all up!).

Enjoy!

Tuesday, April 6, 2010

This Week's Menu

Monday: Beer Salmon
Noodles
Vegetable

Tuesday: Ravioli
Garlic Bread
Green Beans

Wednesday: Enchiladas
Refried Beans
Peas

Thursday: Dinner at Rachel's

Friday: Baked Risotto Torte
Salad

Saturday: Hamburgers and Hotdogs
Potato Salad
Cole Slaw
French Fries

Saturday, April 3, 2010

Baked Sesame Chicken

I know, I know. I have been super lax about putting up new recipes. I do have some excuses lined up for you, but first I will apologize.

Sorry.

But, I do have some fabulous recipes in the wings just waiting to be posted for your enjoyment. I promise. I super duper promise.

First off, this one--Baked Sesame Chicken. I have no idea where I found this recipe (probably the internet or some magazine), but I love this recipe because of two reasons:
1. It has sesame seeds and I L-O-V-E sesame seeds. They are so crunchy and delicious.
2. It is easy. I am not kidding. It's so easy your dog could make it.

So, let's get started!

Ingredients:

2 Tbsp. of soy sauce; 1/4 C. toasted sesame seeds; 1/4 tsp. salt; 1 pinch of ground black pepper; 4 boneless, skinless chicken breast halves; 2 Tbsp. butter, melted.

See that hoisin sauce in the picture above? Yeah, you don't need it. I have no idea why I got it out and put it in this picture. My bad.

Oh, and something I neglected to put in the picture? Flour.

Yeah, you'll need 2 Tbsp. of the stuff.

Preheat the oven to 400 degrees.

Okay, let's start with the sesame seeds. You will note that in the ingredients, it tells you to toast the sesame seeds. Well, I didn't. As you can tell from the many things I've already had to correct, I was not in a good mental place when I was making this recipe. I probably shouldn't have been around knives or fire or children or any motorized vehicles. I don't remember feeling flustered or stressed out. I kind of think I was just having one of those "I've lost my ever loving mind and need lots of professional help" days. It happens.

So, take your (hopefully) toasted sesame seeds.

Add the flour

and the salt

and the pepper.

Mix them together.

Now, in a 9x13, add the soy sauce. (Is it just me, or is my oven not level?)

Please take your chicken and dip it in the soy sauce.

Then roll it in the flour mixture.

Place it in the 9x13. Now, I had chicken tenders, so I used about 12 of them (because I wanted leftovers). Because I used more, I ended up needing to double the flour mixture ingredients. Just to let you know.

Take the melted butter and drizzle it all over the chicken. Put the dish in the oven for 40 minutes (unless you did tenders like me, and I did it for about 25 minutes).


And that's it! When they are done they will look like this!!!

I served ours with roasted brussel sprouts and rice (of course...we love rice).


The thing about this dish, besides its simplicity, is that it tastes so darn good! The meat is so tender and I love love love the sesame seeds with the soy sauce. This recipe is the reason that I have a constant supply of sesame seeds in my pantry!